How to Spot Rot Before It Spreads: A Homeowner’s Walk-Around Checklist
Wood rot is one of those exterior home problems that can start quietly. A little peeling paint around a window, a dark spot near a door frame, or trim that looks slightly swollen may not seem like a major concern. But when moisture repeatedly reaches wood and the material cannot dry properly, deterioration can develop over time.
The challenge is that homeowners often notice the visible symptoms before they know what is happening underneath. A damaged-looking trim board may be a simple paint issue, or it may be a sign that water has been getting behind the exterior surface.
In Central Texas, heavy rain, humidity, intense sun, and changing weather conditions can all put stress on exterior materials. The goal is not to assume every stain or crack means rot. It is to recognize warning signs, identify areas where water may be entering, and address problems before they become more extensive.
Here is a practical walk-around checklist to help you inspect the exterior of your home.
First, What Is Wood Rot?
Wood rot is deterioration caused by fungi that break down wood when moisture conditions allow them to grow. It commonly develops in areas that stay damp or repeatedly get wet without drying properly.
It can affect visible exterior components such as:
Wood siding.
Window and door trim.
Fascia and soffit boards.
Exterior door frames.
Decorative wood features.
Wood framing or sheathing hidden behind siding.
Not every moisture problem leads to rot, and not every damaged-looking board is rotten. However, recurring moisture deserves attention because it can affect more than the surface you can see.
The most important question is not simply whether a piece of wood looks damaged. It is where the moisture is coming from and whether the surrounding materials have also been affected.
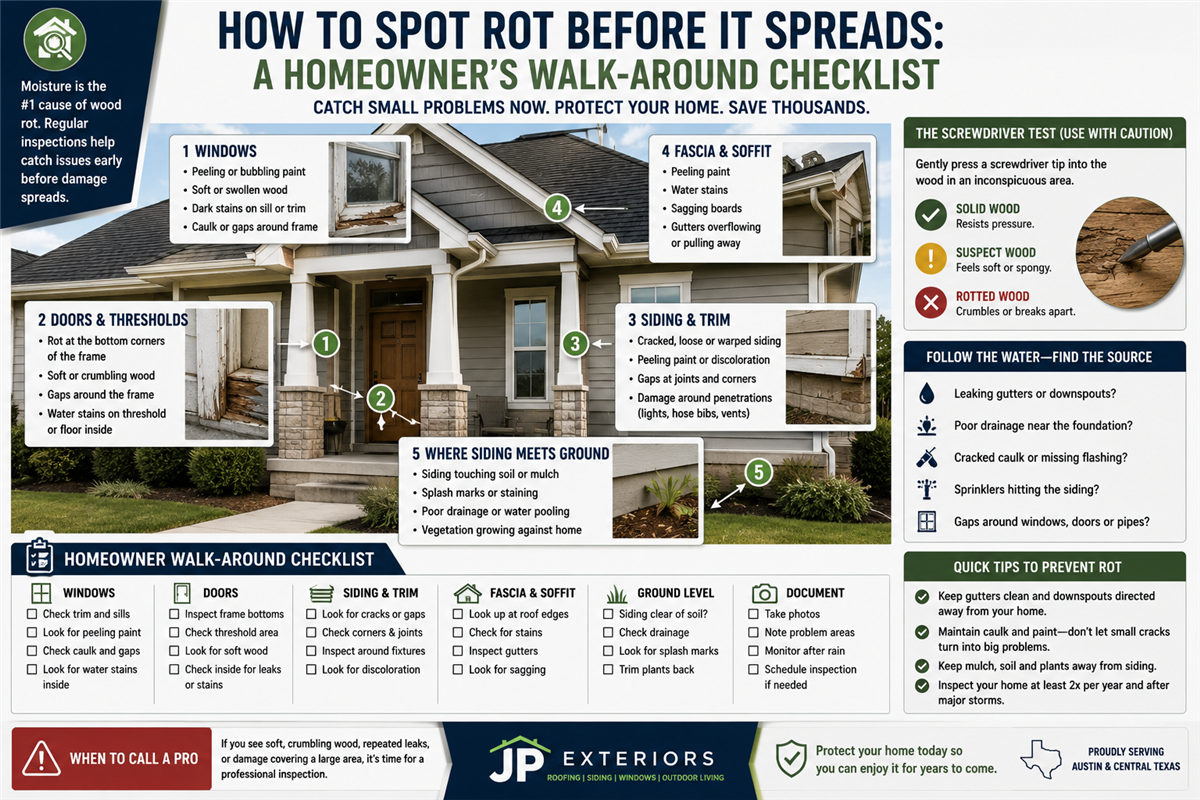
1. Start With Your Windows
Windows are one of the first places homeowners should inspect because they create openings in the exterior wall. The surrounding trim, flashing, sealants, and drainage details all play a role in keeping water out.
Walk around the outside of your home and look closely at the areas above, below, and beside each window.
Warning signs to look for
Peeling or bubbling paint around the window trim.
Dark discoloration along the bottom sill.
Cracked or deteriorated exterior trim.
Gaps where the window trim meets the siding.
Swelling, warping, or separating materials.
Water stains on the interior wall near a window.
Repeated moisture or staining in the same location.
Pay particular attention to the bottom corners and sill area. Water can collect or enter around poorly performing joints and transitions, and damage may develop behind the visible trim.
What could be causing it?
Possible contributors include deteriorated sealant, damaged flashing, improper drainage, or a window installation detail that allows water to reach vulnerable materials.
Simply applying another layer of caulk may not solve the underlying problem. If water is entering behind the trim, the source needs to be identified.
Homeowner tip: Take a picture of any suspicious window area and check it again after the next significant rain. If the staining or moisture keeps returning, arrange an inspection.
2. Check Exterior Door Frames and Thresholds
Exterior doors experience frequent use and direct exposure to weather. The bottom corners of door frames and the transition between the threshold and surrounding materials deserve special attention.
Warning signs to look for
Peeling paint near the bottom of the door jamb.
Soft-looking, cracked, or deteriorated trim.
Dark staining near the threshold.
Gaps between the door frame and surrounding siding.
Water stains on flooring just inside the door.
Swelling or changes in the way the door closes.
A door that suddenly sticks does not automatically mean rot. Seasonal movement, hardware problems, and other conditions can also affect how a door operates. But if sticking occurs alongside visible moisture damage, it is worth investigating.
Why the bottom of the frame matters
Water can collect near the threshold, splash against the lower trim, or enter through vulnerable transitions. If the lower ends of wood trim are repeatedly exposed to moisture, deterioration can develop.
Look at the surrounding drainage as well. Does water run toward the doorway? Is there a roof overhang or gutter directing water toward the area? Are nearby surfaces holding water against the home?
The source of the moisture matters just as much as the damaged appearance.
3. Inspect Your Siding and Exterior Trim
Siding is designed to protect the exterior wall, but it is part of a larger system. Flashing, joints, penetrations, sealants, and proper clearances all help manage water.
If one of these details fails, moisture may reach materials behind the siding.
Warning signs to look for
Cracked, loose, or separated siding.
Bulging or warped sections.
Peeling paint or recurring discoloration.
Deterioration around corners and trim boards.
Gaps around exterior penetrations.
Staining below windows or roof-to-wall transitions.
Visible damage near the bottom of the siding.
Look carefully around hose bibs, electrical penetrations, exterior lights, and other areas where something passes through the siding.
Also check areas where different materials meet. These transitions may require specific flashing or sealant details to help direct water away from the wall.
What if you have James Hardie fiber cement siding?
Fiber cement is different from traditional wood siding and does not rot in the same way wood does. However, the wall assembly behind it can still be affected if water gets past the exterior cladding.
The joints, penetrations, flashing, and sealant details remain important. James Hardie recommends routine maintenance and attention to connections that help prevent moisture from entering behind the siding.
A damaged or stained section of fiber cement does not automatically mean the framing behind it is damaged. It does mean the area should be evaluated if there are signs of recurring water intrusion.
4. Look Up at the Fascia and Soffit
The fascia is the board along the roof edge that commonly supports the gutter. The soffit is the material underneath the roof overhang.
These areas can be easy to overlook because they are above eye level. However, roof edges and gutters are important parts of the home's water-management system.
Warning signs to look for
Peeling paint along the fascia.
Dark streaks or water stains behind the gutter.
Sagging or separated fascia boards.
Soft-looking or deteriorated corners.
Gaps or damage in the soffit.
Gutters that overflow or pull away from the roofline.
A gutter that leaks or overflows can repeatedly expose the fascia to water. Damaged roof edges or flashing may also contribute to moisture problems.
If you see staining behind a gutter, do not assume the gutter itself is the only issue. The roof edge, drip edge, fascia, and drainage details may all need to be evaluated.
Important: Avoid climbing onto the roof or leaning over gutters to inspect these areas. Use ground-level observations or have a qualified professional take a closer look.
5. Check Where the Siding Meets the Ground
The bottom edge of your exterior siding deserves attention, particularly where landscaping, soil, mulch, or concrete comes close to the wall.
Warning signs to look for
Siding that appears to be touching soil or mulch.
Dirt or mulch piled against the exterior wall.
Water pooling near the foundation.
Splash marks or persistent staining along the bottom of the siding.
Vegetation growing directly against the exterior.
Visible deterioration near the base of wood siding or trim.
When materials remain in contact with wet soil or landscaping, they may have less opportunity to dry. Sprinklers that repeatedly spray the same section of the house can create a similar concern.
Check whether the ground slopes away from the home and whether downspouts discharge water away from the foundation.
The appropriate clearance depends on the siding product and installation requirements. Avoid covering the bottom edge of siding with additional landscaping material.
6. Know the Difference Between Warning Signs and Confirmed Rot
One of the biggest mistakes homeowners make is assuming that every exterior stain or peeling paint spot means the wood underneath is rotten.
These conditions can indicate moisture exposure, but they are not proof of decay by themselves.
What you see | What it could indicate |
|---|---|
Peeling paint | Moisture exposure, paint failure, or inadequate surface preparation |
Dark discoloration | Water staining, dirt, mildew, or possible deterioration |
Swollen or warped trim | Moisture exposure or material movement |
Cracked or separated joints | Failed sealant, movement, or water-entry pathways |
Soft, crumbling, or deteriorated wood | Possible advanced wood decay |
Recurring interior water stains | A moisture issue that may involve the window, roof, siding, or another building component |
A professional inspection can help determine whether the problem is limited to the finish, involves the visible exterior material, or extends behind the siding.
Should you use a screwdriver to test for rot?
You may see advice online recommending that homeowners poke questionable wood with a screwdriver. While professionals sometimes use probing tools during an inspection, homeowners should be cautious.
Poking or scraping a painted surface can create additional damage, disturb older coatings, or open a pathway for water. It can also be unsafe around concealed electrical components or deteriorated materials.
For a routine walk-around, stick to visual observations. Photograph suspicious areas and have a qualified professional evaluate them if you suspect deterioration.
7. Follow the Water: Find the Possible Source
If you find a suspicious area, look beyond the damaged surface.
Water can travel from one location and show up somewhere else. A stain around a window, for example, may be related to a problem above the window rather than the window itself.
During your walk-around, consider these questions:
Is a gutter leaking or overflowing above the area?
Does a downspout discharge too close to the house?
Is water collecting on a roof-to-wall transition?
Are there gaps around windows, doors, or exterior penetrations?
Does landscaping or a sprinkler system keep the area wet?
Are nearby joints or flashing visibly damaged?
Does the same area become wet after every significant rain?
This approach helps shift the focus from covering up a symptom to identifying the source of the moisture.
Replacing a damaged trim board without correcting the water-entry problem may simply lead to the same issue again.
8. A Simple Homeowner Walk-Around Checklist
You do not need special equipment to perform a basic visual inspection. Set aside some time to walk around the property and take pictures of anything that looks unusual.
Use this checklist every few months and after significant storms.
Windows and doors
Look for peeling or bubbling paint around window trim.
Check for discoloration along window sills.
Look for gaps around window and door frames.
Inspect the lower corners of exterior door jambs.
Watch for recurring water stains inside near exterior openings.
Siding and trim
Look for cracked, loose, or warped siding.
Check corners and trim connections.
Inspect areas around lights, hose bibs, and other penetrations.
Look for recurring stains or deterioration.
Make sure landscaping is not covering or pressing against siding.
Roof edges and drainage
Look for peeling paint or staining along fascia boards.
Check for gutters that appear loose or overflow.
Look for damaged or separated soffit materials.
Confirm that downspouts direct water away from the home.
Check for standing water or poor drainage near the foundation.
Document what you find
Take photos of suspicious areas.
Note whether the problem gets worse after rain.
Record whether the same area has been repaired before.
Arrange a professional inspection if signs keep returning or materials appear deteriorated.
9. What Happens If You Find Rot?
The right solution depends on how much material is affected and what allowed the moisture to reach it.
In some cases, the issue may be limited to a small section of exterior trim. In others, an inspection may reveal damage to siding, sheathing, or framing behind the exterior surface.
Possible next steps can include:
Addressing the moisture source: Repairing a leaking gutter, correcting drainage, or addressing a flashing or sealant issue may help prevent additional exposure.
Replacing damaged exterior materials: Deteriorated wood trim or siding may need to be removed and replaced. Painting over damaged material does not restore its strength.
Investigating concealed damage: If the visible condition suggests water may have reached the wall assembly, additional inspection may be needed to determine the extent of the problem.
Planning a larger exterior replacement: If deterioration is widespread or multiple components are nearing the end of their useful life, replacing sections of siding, trim, or windows may be more practical than repeatedly repairing isolated areas.
The goal is to identify the full scope before deciding on a repair or replacement. A surface-level fix may not be enough if moisture is still entering the wall.
10. How to Help Prevent Exterior Wood Rot
You cannot control every rainstorm or eliminate all moisture exposure, but routine maintenance can help reduce the conditions that contribute to wood deterioration.
A few habits make a difference:
Keep gutters and downspouts clear so water can drain properly.
Direct downspout discharge away from the home's foundation.
Maintain appropriate ground clearance around siding.
Trim shrubs and vegetation so exterior surfaces can dry.
Keep an eye on paint and finish deterioration around wood trim.
Address damaged flashing and failed sealant where appropriate.
Avoid directing sprinklers toward siding, windows, and doors.
Investigate recurring water stains instead of repeatedly painting over them.
James Hardie's maintenance guidance also emphasizes maintaining joints, penetrations, flashing, sealants, gutters, and proper ground clearances. These details help protect the exterior wall system, even when the visible siding itself is designed to resist moisture-related deterioration.
Frequently Asked Questions
What are the first signs of wood rot around a house?
Early warning signs can include peeling paint, discoloration, swelling, cracking, or recurring moisture around windows, doors, siding, and fascia. These symptoms do not prove rot, but they can indicate that water is reaching the area and should be investigated.
Can wood rot spread behind siding?
Yes. If moisture reaches wood sheathing or framing behind the exterior siding and the materials remain damp, deterioration can develop out of view. The extent of concealed damage cannot always be determined from the exterior appearance alone.
Does peeling paint always mean wood rot?
No. Peeling paint can result from moisture, aging finishes, poor surface preparation, or other conditions. It is a reason to investigate the area, not proof that the wood underneath has deteriorated.
Can new siding cover up existing rot?
Installing new siding without addressing damaged underlying materials can leave an existing problem unresolved. The condition of the existing siding and the materials behind it should be evaluated before replacement. A proper replacement project should address unsuitable or damaged materials as part of the agreed scope.
Does James Hardie siding rot?
James Hardie fiber cement siding is not wood and does not rot like traditional wood siding. However, water can still affect the materials behind the siding if moisture enters through improperly maintained or damaged connections, penetrations, or flashing details.
How often should I inspect my home's exterior?
A visual walk-around every few months is a practical habit, along with additional checks after significant storms or when you notice recurring moisture. Pay particular attention to windows, doors, roof edges, gutters, and areas where siding meets landscaping.
Should I replace all my siding if I find one rotten board?
Not necessarily. The appropriate scope depends on the location, extent of the damage, condition of the surrounding materials, and whether the source of moisture can be corrected. An inspection can help determine whether a localized repair or a larger replacement is appropriate.
The Bottom Line
Wood rot rarely begins as a major, obvious problem. More often, homeowners first notice peeling paint, discoloration, swelling, or recurring moisture around an exterior opening or trim board.
Those signs are worth investigating, especially when they keep returning after rain or repairs.
A simple walk-around can help you catch potential problems earlier, but remember that the visible damage may not tell the whole story. Identifying where water is entering—and checking whether the materials behind the exterior surface have been affected—is what helps determine the right solution.
At JP Exteriors, we help Central Texas homeowners evaluate and improve the exterior components that protect their homes, including siding, windows, doors, roofing, and exterior trim.
Get Started With a Free Roofing Consultation
If you have noticed deteriorating siding, damaged exterior trim, or signs of moisture around your windows and doors, JP Exteriors can help you discuss the condition of your home's exterior and determine whether a larger replacement project may be appropriate.
Remember: When you refer a friend or neighbor for windows, siding, roofing, or door replacement, you can earn up to $250 through the JP Exteriors Referral Program.
Subscribe to JP Exteriors's Blog




Comments