A Tube of Caulk Can Make a Siding Problem Disappear. That Doesn't Mean It's Fixed.
You notice a gap around a window, a crack in the caulk near a corner, or a joint in your siding that looks like it could use a little attention. The solution seems simple: grab a tube of exterior sealant, fill the gap, smooth it out, and move on.
Sometimes, that is exactly the right repair.
Other times, the caulk hides the symptom while the underlying problem continues. Water may still be entering behind the siding, flashing may be missing, or a joint designed to drain may now be sealed shut.
The difference matters because exterior siding is more than a decorative shell. It is part of a wall assembly that must manage rain, moisture, movement, and drying.
In Austin and throughout Central Texas, exterior materials face strong sun, hot temperatures, heavy rain, and repeated wet-dry cycles. Sealants can help protect vulnerable joints, but they also age, move, and eventually require maintenance.
The goal isn't to caulk every gap. It's to control water without blocking the paths the wall needs to drain and dry.
Let's look at where caulk belongs, where it can create problems, and how to tell when a siding issue needs more than another bead of sealant.
1. What Caulk Actually Does—and What It Cannot Do
Exterior caulk and sealants help close certain joints where water or air could pass through. They're commonly used around trim, windows, doors, and selected transitions between building materials.
A suitable sealant can help accommodate small amounts of movement while reducing water entry at a properly designed joint.
But caulk has limits.
It is not a substitute for:
Flashing that directs water away from vulnerable joints.
A continuous water-resistive barrier behind the siding.
Correctly installed siding and trim.
Drainage paths that let water escape.
Repairing rotten wood, damaged sheathing, or deteriorated framing.
Correctly addressing movement between materials.
This is the distinction that often gets missed during maintenance.
A wall can look sealed from the outside but still have a water-management problem behind the surface. Siding systems are designed with overlapping materials, flashing, and drainage details because exterior cladding should not be expected to act as a perfectly watertight barrier on its own.
Building Science Corporation explains this principle in its guidance on water-managed walls: water that gets past the exterior cladding needs a reliable way to drain back out.
That means caulk is one tool in the system—not the entire system.
2. Where Caulk Usually Belongs on Siding
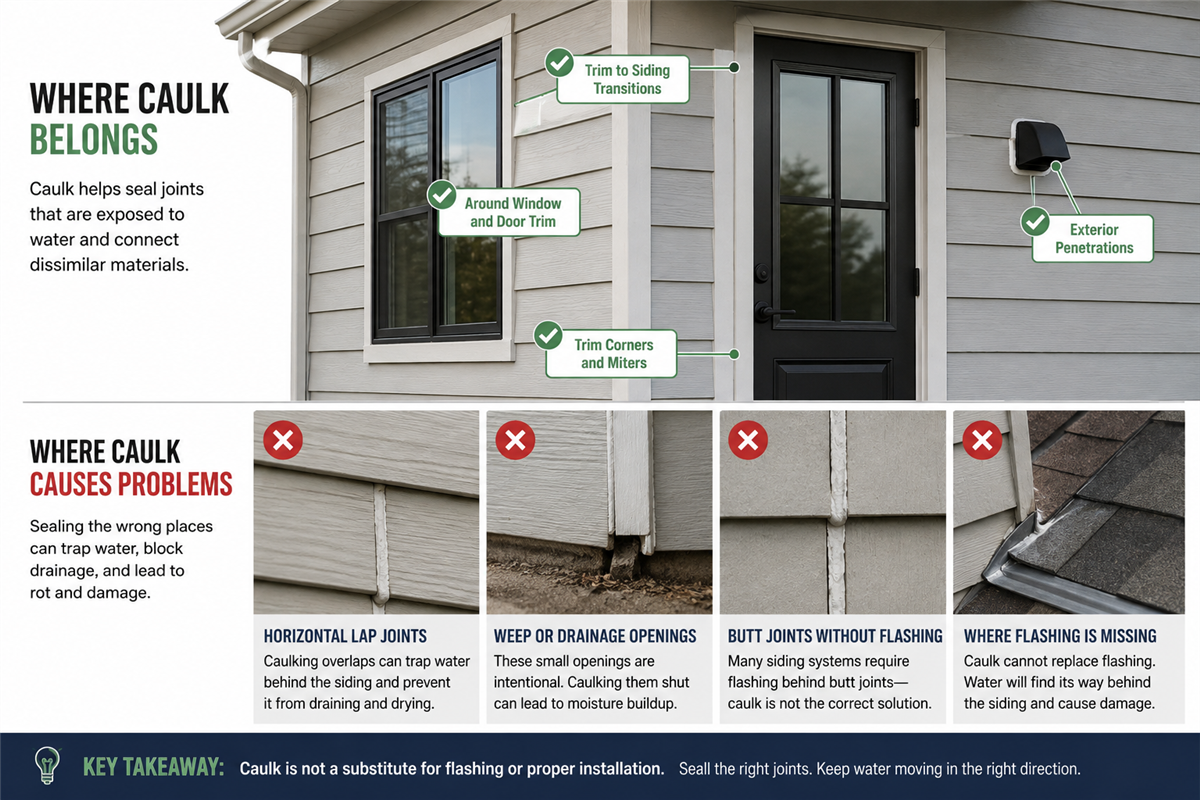
The correct locations depend on the siding material, the joint design, the manufacturer's instructions, and the way the wall is constructed. Still, several areas commonly call for properly selected exterior sealant.
Around window and door trim
The joints where exterior trim meets siding or where trim meets a window or door frame may require sealant.
These joints can be exposed to wind-driven rain, and their materials may move at different rates as temperatures change.
However, the visible bead of caulk is only one part of the detail. Proper flashing and water management around the opening remain important. If water is getting behind the window trim because flashing is missing or incorrectly installed, adding caulk at the outside edge may not solve the problem.
At selected trim-to-siding transitions
Some joints between siding and trim are designed to be sealed. The correct approach depends on the siding system and its installation instructions.
Before filling a gap, identify what the joint is intended to do. A small gap may be a defect, but it could also be an intentional clearance for movement or drainage.
When the installation instructions call for sealant, use a compatible product and follow the specified joint preparation, gap dimensions, and curing requirements.
Around certain exterior penetrations
Pipes, cables, vents, and other items that pass through siding can create opportunities for water entry.
Some penetrations require sealant, while others need a properly integrated flashing, boot, flange, or other purpose-built detail. The correct treatment depends on the penetration and the materials involved.
A large opening around a vent, for example, should not automatically be treated as a caulking project. The assembly must shed water and remain compatible with the product manufacturer's requirements.
At joints specifically identified by the siding manufacturer
This is especially important with fiber cement siding.
James Hardie provides product-specific installation instructions covering joint treatments and other details. Requirements can vary by product, climate, and installation method. Some joints may call for sealant, while others use flashing or another specified treatment.
For homeowners, the practical lesson is simple: don't assume every seam in a siding wall should be caulked just because it looks like a gap.
3. Where Caulk Can Cause Problems
Some of the most common mistakes happen when someone treats every opening as a defect.
A joint that appears unfinished may actually serve a purpose. Sealing it without understanding the detail can interfere with drainage or movement.
Horizontal overlaps in lap siding
Lap siding is installed in overlapping courses. That overlap helps shed rainwater down the exterior.
Depending on the product and installation method, water that gets behind the siding may also need a path to drain out. Sealing a joint that is supposed to remain open can interfere with that process.
James Hardie's technical guidance for certain lap siding systems specifically advises against caulking horizontal overlaps because it can interfere with drainage and drying. The manufacturer instead recommends appropriate joint flashing for certain butt joints.
This is not a universal instruction for every siding product or every joint. Always follow the current installation guide for the exact siding system.
The larger principle is that an intentional drainage path should not be mistaken for a gap that needs filling.
Weep or drainage openings
Some exterior wall details include openings that allow water to escape. These may occur at specific trim assemblies, flashing edges, or other designed drainage points.
Filling these openings with caulk can trap water that was supposed to drain out.
If you see a small opening near the bottom of a trim assembly, don't assume it is a defect. Identify the assembly and determine whether the opening is part of its drainage design before sealing it.
Butt joints and siding seams
The correct treatment for siding butt joints varies by product.
Some systems use joint flashing behind the seam. Others have manufacturer-approved sealant requirements or specific joint treatments.
Applying caulk over every visible seam may seem like extra protection, but it can create an appearance problem, interfere with intended movement, or depart from the manufacturer's installation requirements.
The right question isn't, "Can I fill this seam?" It's, "What does this siding system require at this seam?"
Gaps caused by movement or structural changes
If a gap keeps returning after it has been caulked, the sealant may not be the real issue.
Possible causes include movement between materials, loose trim, improper fastening, or a joint that was never intended to be sealed rigidly.
A sealant designed for the wrong joint may crack or pull away repeatedly. Reapplying it without addressing the underlying condition can become a maintenance cycle rather than a lasting repair.
4. The Biggest Mistake: Using Caulk Instead of Flashing
Flashing is designed to direct water away from vulnerable joints and back toward the exterior. It is especially important around windows, doors, roof-to-wall intersections, and other places where building materials meet.
Caulk and flashing serve different purposes.
A sealant helps close a particular joint. Flashing manages water by directing it along a planned route.
When flashing is missing, incorrectly installed, or damaged, a bead of caulk may not stop water from entering behind the siding.
Example: Water getting behind window trim
Imagine that a homeowner notices peeling paint or swelling trim near the top corner of a window.
The visible damage may suggest a failed caulk joint. But the underlying issue could involve head flashing, the way the window was integrated with the wall's water-resistive barrier, or another detail that directs water behind the trim.
Adding sealant at the visible joint may reduce some water entry, but it won't necessarily correct the path water is taking behind the wall.
A proper evaluation looks at the full detail, including how water is supposed to shed away from the opening.
Example: Rotten siding near a roofline
Water damage near a roof-to-wall intersection can also be mistaken for a simple caulking problem.
If kickout flashing is missing or improperly installed, water running off the roof may be directed behind the siding at the wall's lower corner. Caulking the damaged siding won't correct that drainage path.
The flashing detail needs to be evaluated, and any damaged materials may need repair or replacement.
This is why recurring water damage should be investigated rather than repeatedly covered with sealant.
5. Why Over-Caulking Can Trap Moisture
The phrase "trapped moisture" gets used frequently in siding discussions, but the mechanism deserves a closer look.
Rainwater can enter behind exterior cladding through joints, penetrations, or other openings. A properly designed wall assembly allows that water to drain outward and provides opportunities for the materials to dry.
If someone seals a designed drainage opening, water may have fewer ways to escape. If a repair blocks a ventilation or drying path required by the assembly, drying can also become more difficult.
The result depends on the wall's construction, the amount of water involved, and the materials behind the siding.
Potential consequences include:
Wood trim or sheathing that stays damp longer than intended.
Paint that peels, blisters, or fails prematurely.
Deterioration of wood-based materials.
Corrosion of susceptible metal components.
Conditions that may support fungal growth when moisture persists.
Not every over-caulked joint will cause rot, and caulk itself is not inherently harmful. The problem occurs when sealant is used in a location where it interferes with the wall's intended drainage, drying, or movement.
The better approach is to preserve the designed water-management system while sealing the joints that actually require it.
6. Austin's Heat Makes Sealant Selection and Installation Important
Exterior sealants have to withstand more than rain. They also experience temperature changes, sunlight, and movement between building materials.
In Central Texas, intense summer sun can heat exterior surfaces significantly. Different materials expand and contract at different rates, and some joints experience repeated movement over the years.
That makes sealant selection important.
Use a product suitable for the actual joint
Exterior sealants differ in their flexibility, adhesion, paintability, compatibility, and recommended applications.
A product intended for a small trim joint may not be suitable for a large moving joint or a connection involving a different material. Follow the sealant manufacturer's instructions and the siding manufacturer's requirements.
Prepare the joint correctly
Even a high-quality sealant can fail if it is applied over loose, dirty, wet, or deteriorated surfaces when the product requires a clean and dry substrate.
Preparation may involve removing failed sealant, cleaning the joint, allowing surfaces to dry, and addressing damaged material first.
Some joints also require backer rod or other preparation to achieve the correct sealant shape and depth. Follow the product instructions rather than filling a deep gap indiscriminately.
Pay attention to weather and curing
Sealants have application-temperature, moisture, and curing requirements. Applying a product outside those conditions can compromise its performance.
The exact limits vary by product, so check the label and technical data sheet before beginning the work.
Don't assume paint will solve a failing joint
Some exterior sealants are paintable, while others are not. Even paintable products need to be compatible with the coating and allowed to cure as directed.
If caulk is cracking because the joint moves too much, painting over it won't correct the underlying issue.
7. How to Tell Whether You Need Caulk, Flashing, or a Siding Repair
Before deciding how to repair a gap, look at the symptoms and where they occur.
| What you notice | Possible explanation | Sensible next step |
|---|---|---|
| A small, stable gap at a trim joint | Failed or missing sealant, if that joint is designed to be sealed | Check the joint detail and use compatible sealant if required. |
| Caulk repeatedly cracking in the same place | Excessive movement, poor joint preparation, or an unsuitable sealant | Identify why the joint keeps moving before resealing. |
| Peeling paint or swollen trim around a window | Water entry, failed sealant, flashing issues, or another moisture source | Inspect the opening and flashing details rather than relying on caulk alone. |
| Rotting siding near a roof-to-wall intersection | Possible flashing or drainage problem | Have the roof-to-wall detail evaluated and repair damaged materials. |
| A visible opening at the bottom of a trim or flashing assembly | It may be an intentional drainage opening | Identify the assembly before filling the opening. |
| Soft siding or wood that crumbles when touched | Material deterioration, potentially from prolonged moisture | Determine the extent of damage; replacing sealant alone is unlikely to be sufficient. |
| A recurring leak after previous caulking | The water source may not be the visible joint | Trace the water path and inspect flashing, penetrations, and the drainage plane. |
These are clues, not diagnoses. Water can travel behind siding before it becomes visible, so the point where damage appears may not be where water entered.
If there is extensive deterioration, a persistent leak, or suspected damage behind the siding, a qualified exterior professional can help identify the source and determine the appropriate repair.
8. What a Proper Siding Repair Should Address
A durable repair starts by understanding why the problem occurred.
Depending on the condition, that may mean removing failed sealant, replacing damaged trim, correcting a flashing detail, or replacing deteriorated siding. In more involved cases, the work may require inspecting and repairing the water-resistive barrier or damaged sheathing behind the cladding.
A sound repair process generally includes the following steps.
Step 1: Identify the water path
Look at the location of the damage, nearby windows and doors, roof-to-wall intersections, penetrations, and other places where water may enter.
Don't assume the nearest visible crack is automatically the source.
Step 2: Determine whether the joint should be sealed
Check the siding manufacturer's current installation instructions and identify the function of the joint. If it is designed to drain or accommodate movement, sealing it may be inappropriate.
Step 3: Check for damaged materials
Sealant won't restore the strength of rotten trim or damaged sheathing. If moisture has deteriorated the underlying material, that damage needs to be evaluated and addressed.
Step 4: Correct the underlying detail
This may involve installing or repairing flashing, correcting a penetration detail, restoring the intended drainage path, or replacing improperly installed components.
Step 5: Apply sealant where it belongs
Once the joint and surrounding materials are sound, use a compatible sealant if the detail calls for it. Follow the required joint preparation and curing instructions.
Step 6: Verify that water can still drain
A repair should protect the wall without blocking any drainage openings or interfering with the siding system's intended operation.
This is the difference between a repair that simply looks finished and one that addresses how the exterior wall actually manages water.
9. Can You Caulk Siding Yourself?
Small, straightforward caulking jobs can be appropriate for a homeowner who can safely access the area and identify the correct joint.
For example, renewing failed sealant around a sound trim joint may be manageable when the manufacturer's instructions are clear and there are no signs of underlying damage.
But be more cautious when:
The same joint keeps opening after repeated repairs.
Siding or trim is soft, swollen, or rotting.
Water appears inside the home.
The damage is near a roof-to-wall intersection.
You suspect missing or damaged flashing.
The work involves removing siding or opening the wall assembly.
The area is high, difficult to reach, or otherwise unsafe.
A new bead of caulk may improve the appearance without solving the water problem. If the repair requires correcting flashing or replacing damaged siding, it is better to understand the full scope before beginning.
Frequently Asked Questions
1. Should all siding seams be caulked?
No. Some joints require sealant, while others use flashing, overlapping materials, or intentional drainage openings. The correct treatment depends on the siding product and the joint's purpose. Follow the manufacturer's current installation instructions.
2. Can caulk cause siding to rot?
Caulk doesn't automatically cause rot. However, sealing an opening designed to drain or interfere with a wall's drying path can contribute to moisture problems under the wrong conditions. The key is to use sealant only where the assembly is designed for it.
3. Is caulk enough to stop water from getting behind siding?
Sometimes it can help seal a properly designed joint. But it cannot replace missing flashing, a damaged water-resistive barrier, or improperly installed siding. If water keeps entering, investigate the underlying water path.
4. Should I caulk the horizontal overlaps in HardiePlank siding?
Do not assume they should be caulked. James Hardie's guidance for certain lap siding systems advises against caulking horizontal overlaps because it can interfere with drainage and drying. Check the current instructions for the exact product and installation.
5. What should be used at siding butt joints?
The required treatment varies by product and installation method. Some fiber cement siding systems use joint flashing behind butt joints; other details may have different approved requirements. Follow the applicable manufacturer instructions and local requirements.
6. How often should exterior caulk be replaced?
There is no universal replacement interval. Service life depends on the product, joint design, exposure, preparation, and movement. Inspect exterior joints periodically and renew sealant when it shows failure, provided the joint is intended to be sealed.
7. Why does my exterior caulk keep cracking?
Possible causes include joint movement, poor surface preparation, incompatible materials, incorrect joint dimensions, or applying the product outside its specified conditions. Repeated cracking is a reason to investigate the joint instead of simply applying more caulk.
8. Can I paint over exterior caulk?
Only if the sealant is paintable and compatible with the coating. Follow the manufacturer's instructions for preparation and curing. Paint will not correct a joint that is moving excessively or a water-management detail that is improperly designed.
9. How can I tell if water is trapped behind my siding?
Warning signs can include persistent staining, peeling paint, swelling, soft wood, recurring leaks, or deteriorated trim. These signs do not prove that moisture is trapped behind the wall, but they warrant investigation if they persist.
10. Should I replace siding that has begun to rot?
Deteriorated siding often needs replacement rather than simply being sealed or painted. The underlying cause should also be identified, and adjacent materials should be checked for damage. The appropriate scope depends on how far the deterioration extends.
11. Does new siding eliminate the need for caulk?
No. New siding systems may still require sealant at specific joints and transitions. However, new siding should be installed with the flashing, clearances, and drainage details required by its manufacturer. It should not rely on caulk alone to manage water.
12. Who should inspect recurring siding water damage?
A qualified siding or exterior remodeling professional can help evaluate the siding, trim, flashing, and visible water-management details. If the problem appears extensive or involves structural damage, additional evaluation may be needed to determine the full repair scope.
The Takeaway: Seal the Right Joints, Fix the Real Problem
Caulk has an important job in exterior maintenance, but it cannot do every job.
It can help protect a properly designed joint from water entry. It cannot replace flashing, restore deteriorated materials, or correct a wall assembly that has no reliable way to drain moisture.
For Austin homeowners, the best approach is to understand what each joint is supposed to do before sealing it. Keep intentional drainage paths open, use compatible products where sealant is required, and investigate recurring water damage rather than repeatedly covering it up.
The best siding repair isn't the one with the most caulk. It's the one that keeps water moving in the right direction.
Get Started With a Free Consultation
If your siding has recurring gaps, damaged trim, or signs of water intrusion, JP Exteriors can help you discuss the condition of your home's exterior and the options for addressing it. We work with homeowners in Austin and surrounding Central Texas communities on siding replacement and other exterior remodeling projects.
Remember: When you refer a friend or neighbor for windows, siding, roofing, or door replacement, you can earn up to $250 through the JP Exteriors Referral Program.
Subscribe to JP Exteriors's Blog






Comments